
How to Use Residential Proxy on Windows PC (Step-by-Step Guide)

by Jayden Sprent // Feb 15, 2026
Residential proxies feel simple until you actually try setting one up. You follow the instructions, paste the credentials, and still end up with a failed connection.
At that point, most people start changing random settings or assume the provider itself is broken. In reality, residential proxies are extremely sensitive to setup order, and verification.
This guide shows my exact residential proxy use on Windows using Bright Data and
ProxyBridge. But first, I break down the core workflow you can reuse with almost any provider.
How Residential Proxy Setup Works (For Any Provider)
Before diving into a specific provider, it helps to understand how residential proxy setup works in general. The interface and tools may look different, but the core process stays nearly identical.
Once you understand this workflow, switching between proxy providers becomes much easier.
Step 1: Create an Account and Activate a Residential Proxy
Residential proxies always come from a proxy provider. You’ll need to create an account and activate a residential proxy plan or trial.
Most providers require creating something called a proxy zone, gateway, or network. This acts as the control center for your connection. After completing this step, you should receive access to:
-Proxy credentials
-A management dashboard
-Usage monitoring tools
Step 2: Complete Verification Requirements
Residential proxies use real household IP addresses. Because of that, many providers require identity or account verification before enabling full access.
If verification is incomplete, the proxy may appear ready but will fail to connect or route traffic correctly.
Step 3: Install Required Certificates or Network Files
Some providers require installing SSL certificates or additional network components. These allow Windows and browsers to trust the proxy server and establish encrypted connections. Skipping this step commonly causes:
-Secure websites to block connections
-Certificate warnings in browsers
-Silent routing failures
Step 4: Install Proxy Management Software
Proxy credentials alone do not route internet traffic. You need proxy management software to apply those credentials system-wide or inside specific applications.
These tools allow you to:
-Store and manage proxy credentials
-Route traffic through proxy servers
-Control session and rotation behavior
-Test proxy connectivity
Popular proxy routing tools include Proxifier, ProxyBridge, and similar software.
Step 5: Enter Your Proxy Credentials
Inside the proxy software, you will usually enter four key details:
-Server host or IP address
-Port number
-Username
-Password
Some providers include configuration parameters inside the username string. These parameters may control location targeting, session behavior, or IP rotation settings.
Even small mistakes in these fields can prevent connection.
Step 6: Test the Connection
Most proxy software includes a built-in connection testing feature. This confirms whether your traffic is successfully routing through the residential proxy network.
If testing fails, common causes include:
-Incorrect credentials
-Missing certificates
-Incomplete verification
-Blocked firewall permissions
Step 7: Understand IP Rotation Behavior
Residential proxies often rotate IP addresses automatically. This means your IP may change while browsing, refreshing pages, or sending requests. Some providers allow customization through settings such as:
- Sticky sessions
- Country or region targeting
- ISP or IP pool selection
Now that you understand the universal setup workflow, we’re going to go through a complete example using Bright Data as the proxy provider and ProxyBridge as the proxy management software.
How to Set up Bright Data Residential Proxy on Windows
If you think Bright Data isn’t for you, that’s completely fine. The core setup process stays mostly identical across proxy providers, especially if you continue using the same proxy software shown in this tutorial.
Step 1: Create a Bright Data Account
Start by creating an account on Bright Data’s website. I signed up using their trial account just to demonstrate this tutorial, and you can do the same. They usually provide around $2 in test credits, which is enough to confirm whether the service fits your needs before committing.
You should receive a confirmation email shortly after creating your account and proxy zone.
Step 2: Create a Residential Proxy Zone
- Once your account is ready, log into your dashboard.
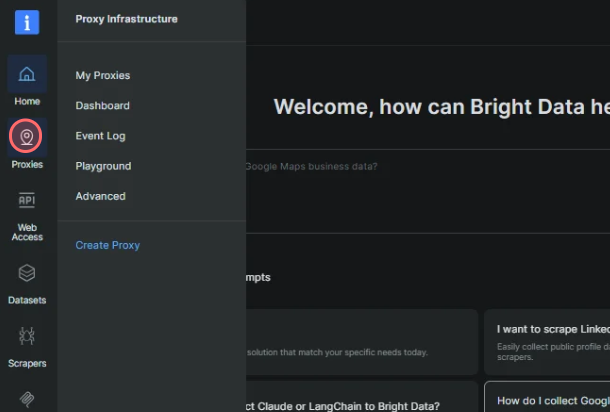
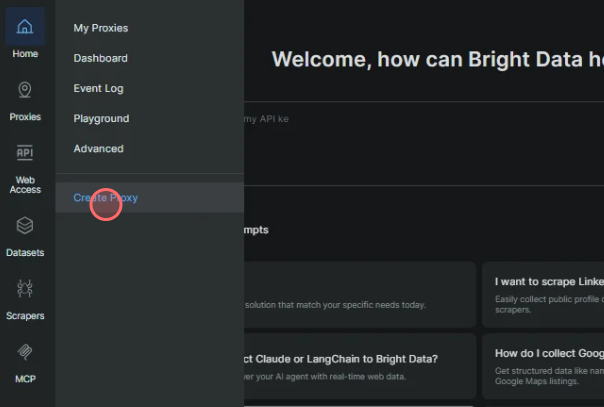
Hover over Proxies on the left sidebar, then click Create Proxy.
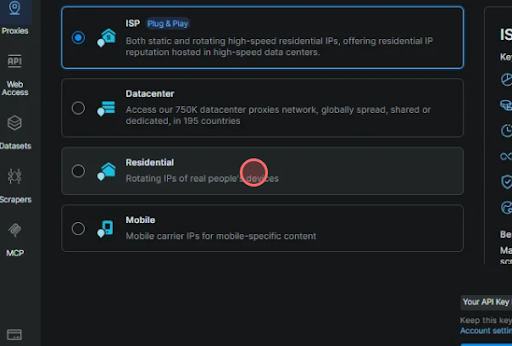
Select Residential Proxy, add a short description if you want to stay organized.
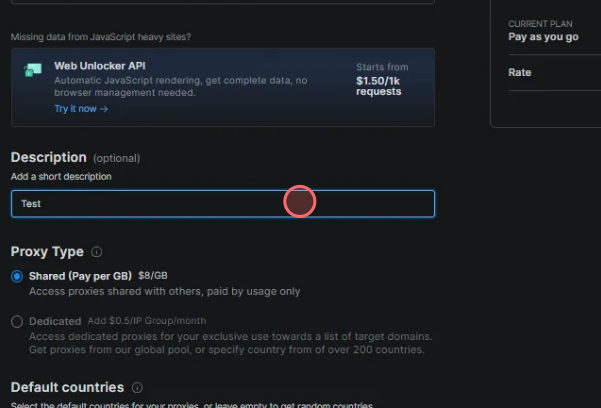
Once you’re done, click Complete or Continue.
Inside the Bright Data dashboard, your residential proxy zone acts as the control center for your proxy connection.
You’ll come back to this dashboard later to retrieve credentials and monitor usage.
Step 3: Download and Install the Bright Data SSL Certificate
You need an SSL certificate for residential proxy connections to function correctly. An SSL certificate tells your computer that the proxy server you’re using is safe to communicate with and allows encrypted, secure traffic between you and websites.
Without installing it, Windows or your browser may block proxy requests because they look suspicious or unsafe.
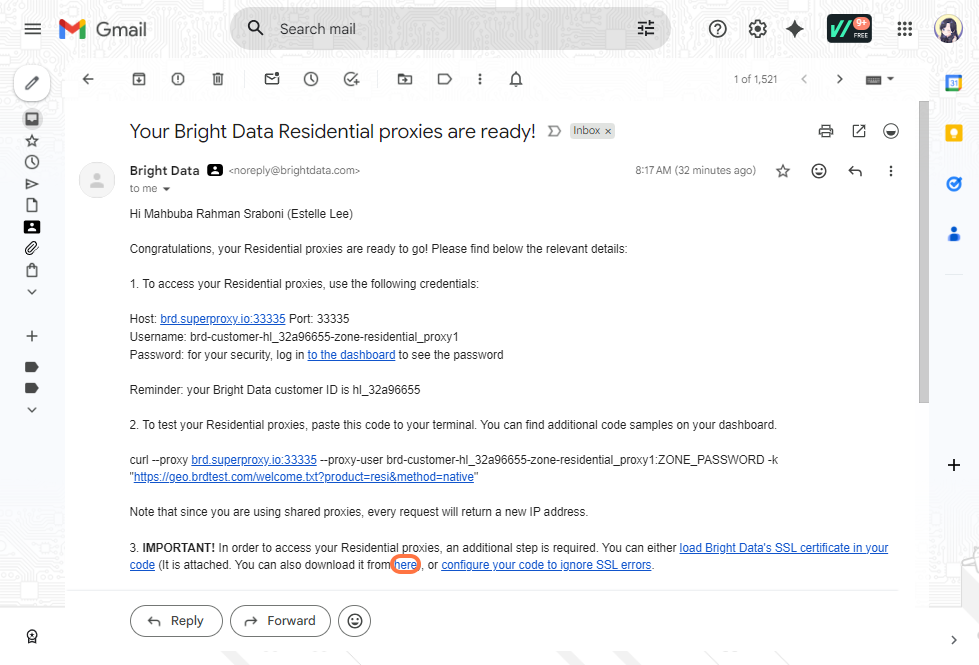
- Open the confirmation email sent by Bright Data.
- Scroll until you find the SSL certificate installation section (point 3). Click the download link provided.
- Go to your Downloads folder,
- Extract the downloaded archive into a new folder, and open it.
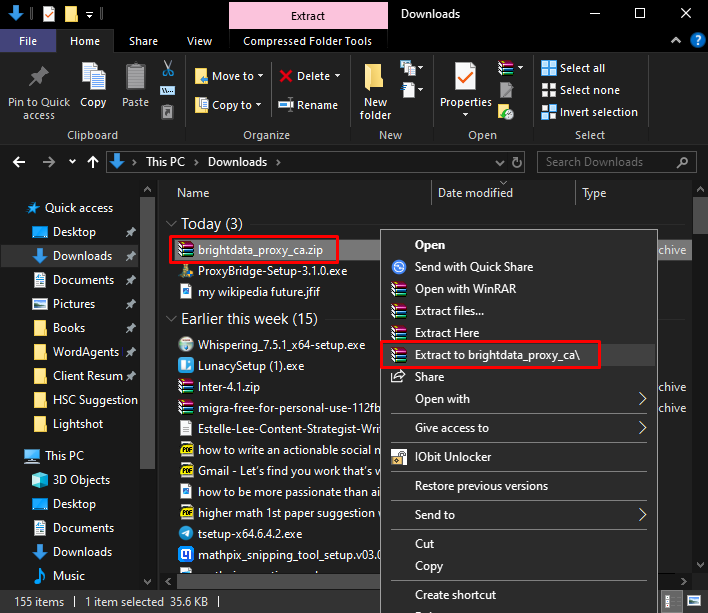
Open the new SSL certificate folder.
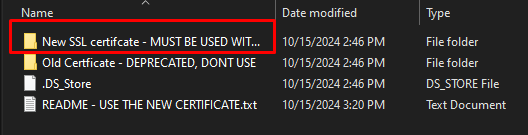
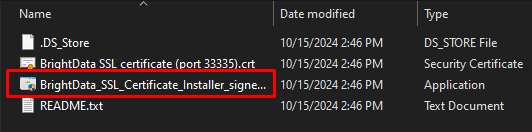
Inside, locate the SSL certificate installer and run it.
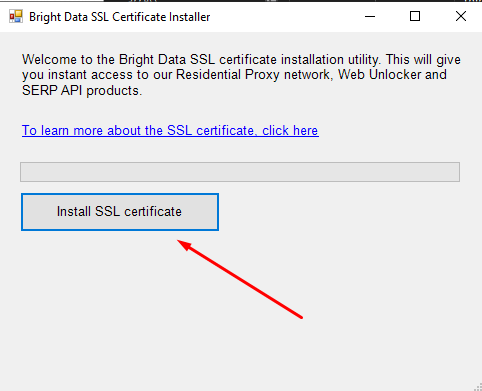
Click Install SSL Certificate and approve any Windows permission prompts.
If Windows Firewall asks for access permissions, allow it to access private networks.
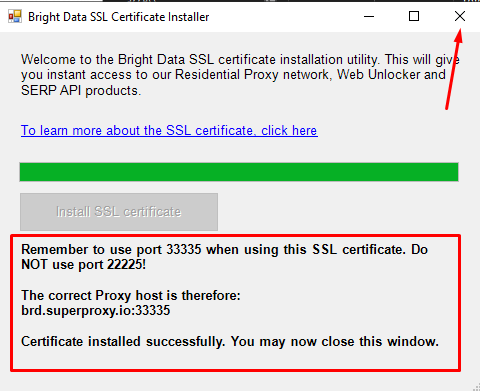
- Once installation finishes, you should see a confirmation message. After that, you can close the installer window.
Step 4: Confirm KYC Verification
Before residential proxies can actually function, Bright Data requires identity verification, also known as KYC.
- Go back to your Bright Data dashboard,
- Hover over Proxies,
- And open My Proxies.
- Click the residential proxy you created and check whether your account verification is completed.
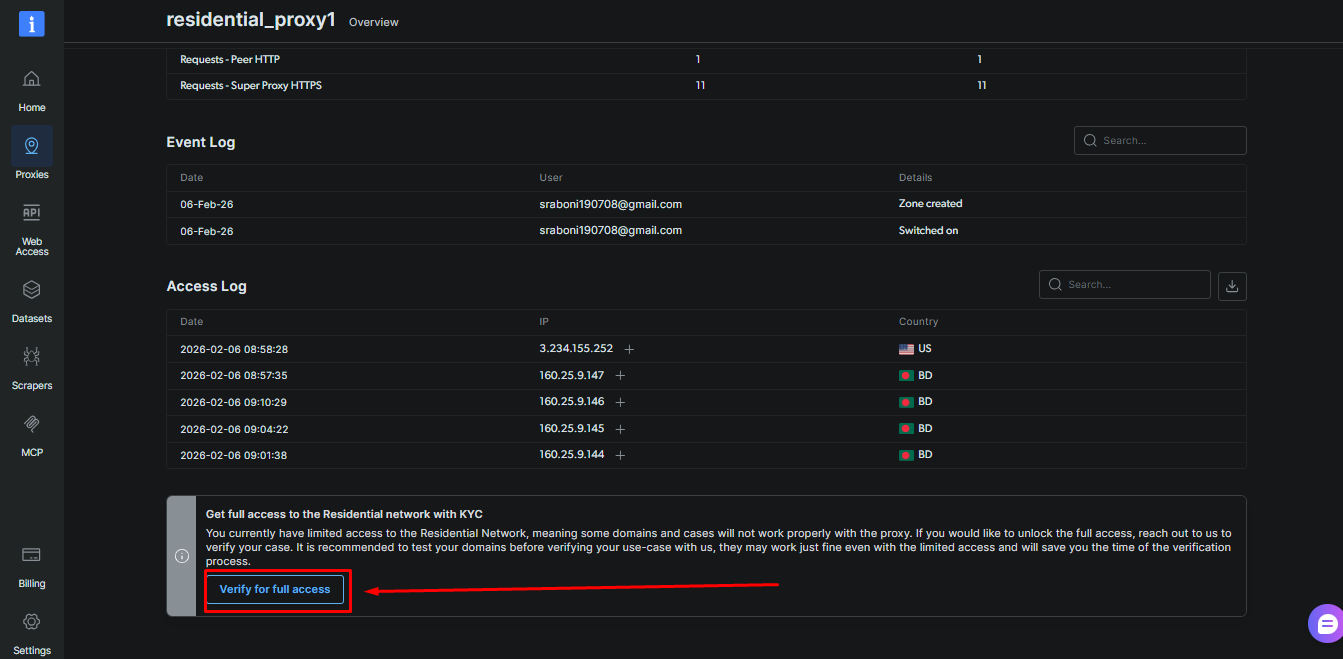
Residential proxies are strictly locked behind KYC. If this step is incomplete, your proxy will not connect regardless of whether everything else is configured correctly.
Step 5: Install Proxy Management Software
Bright Data credentials alone don’t automatically route your internet traffic. You need proxy management software to actually apply those credentials system-wide.
There are several options available. Proxifier is extremely popular and widely trusted, but it becomes paid after a 31-day trial. ProxyBridge, on the other hand, is free, simple, and straight to the point — which is exactly why I’m using it for this tutorial.
If you’re looking for something beginner-friendly that just works without unnecessary complexity, ProxyBridge is a great starting point. Install and open ProxyBridge before moving forward. Make sure to grant all necessary Private Network firewall permissions.
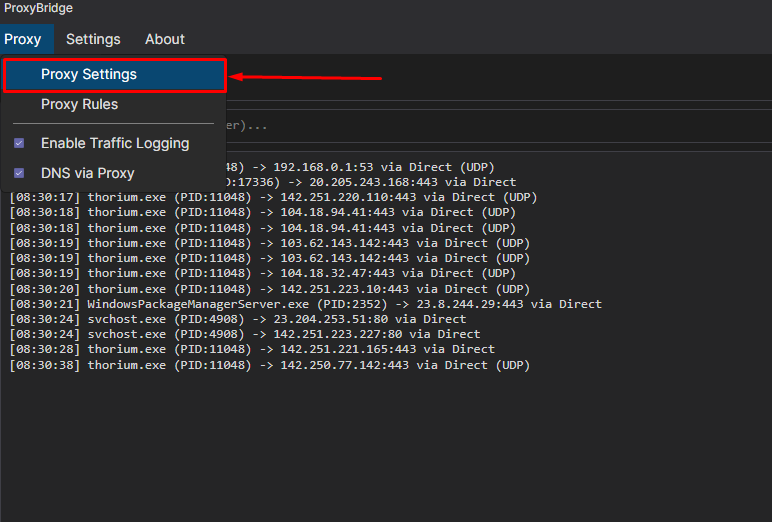
Step 6: Open ProxyBridge Connection Settings
Launch ProxyBridge and click Proxy from the top menu.
- Then select Proxy Connections. This is where you will create and manage your proxy profiles.
Step 7: Locate Your Bright Data Proxy Credentials
- Return to your Bright Data dashboard,
- Hover over Proxies, and open My Proxies.
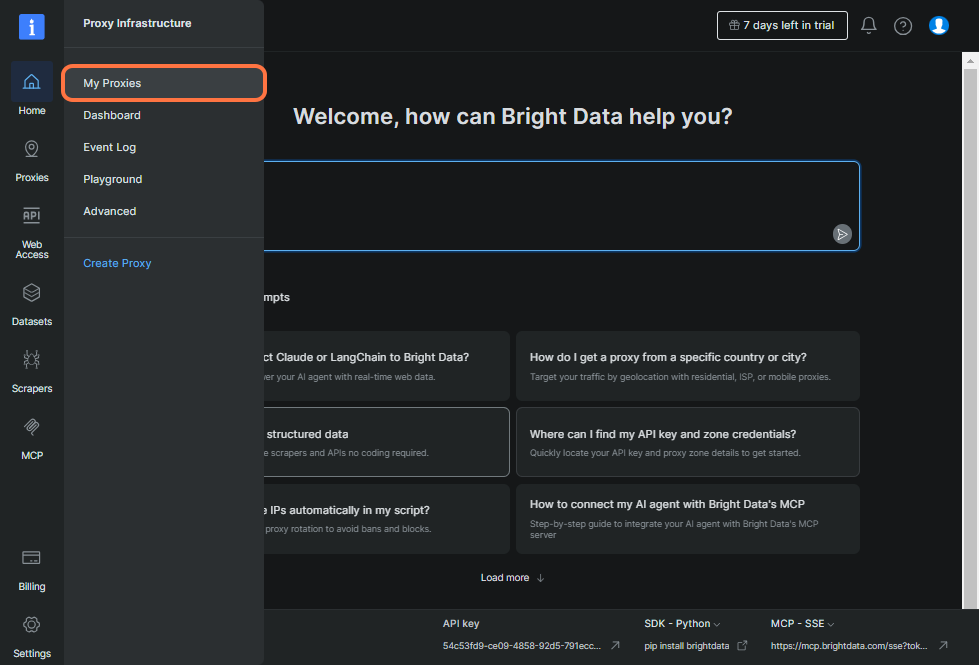
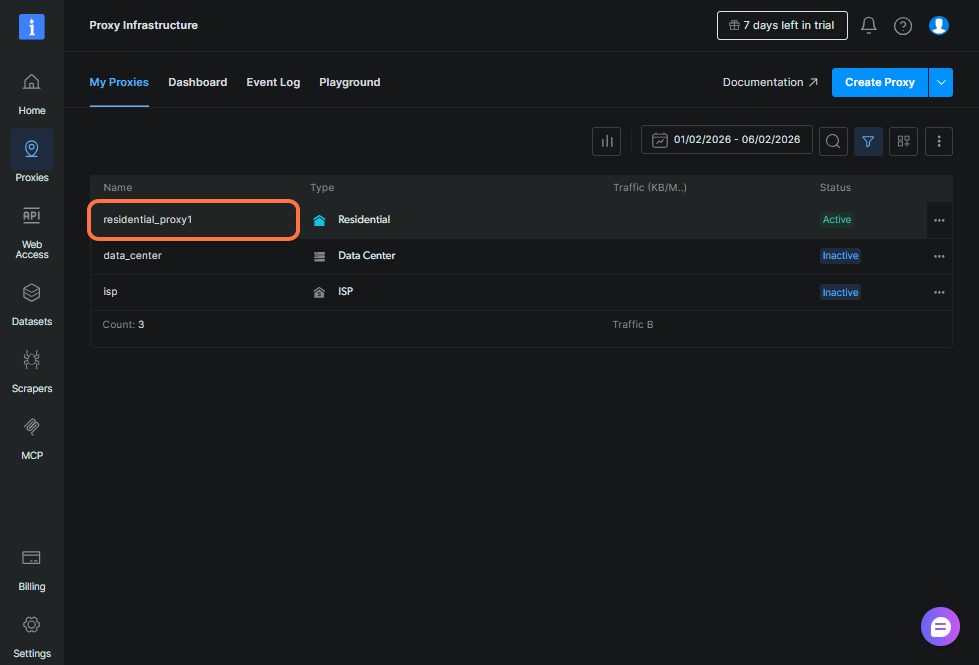
Select your residential proxy zone and open the Overview tab.
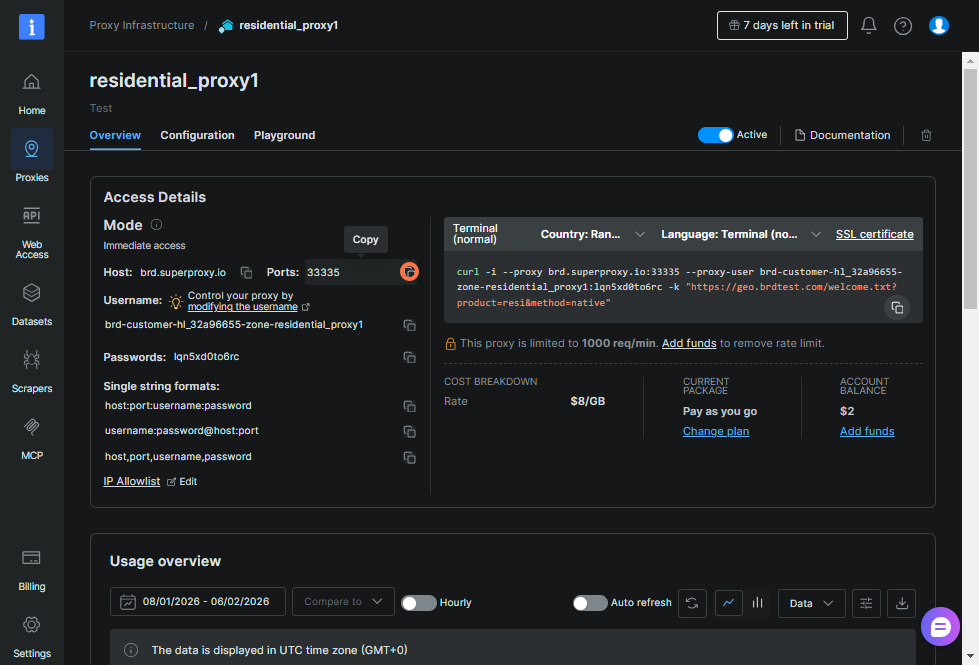
Here you’ll find the credentials you need:
- Host (Server Address)
- Port
- Username
- Password
Note that the Host and IP address fields often refer to the same server location. For security reasons, you may need to manually reveal or retrieve the password from the dashboard.
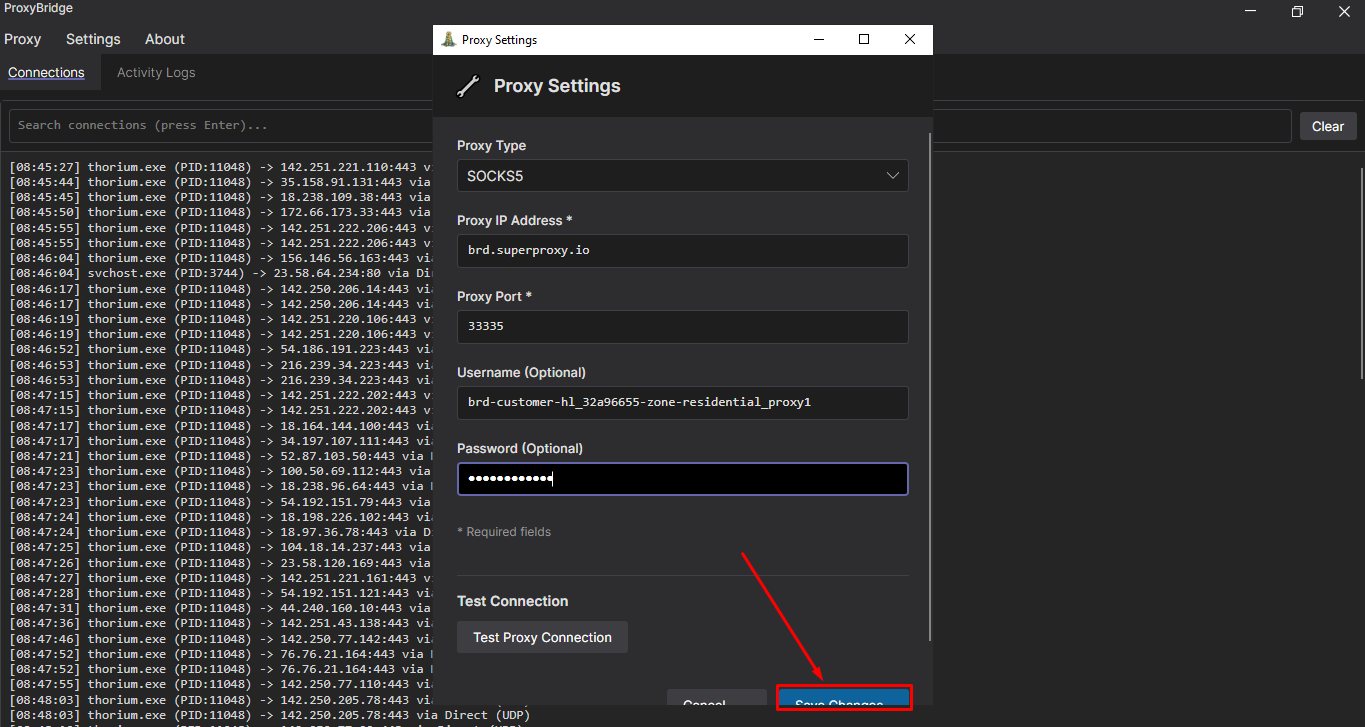
Step 8: Enter Proxy Credentials into ProxyBridge
Copy the credentials one by one and inside ProxyBridge, paste each credential into its matching field.
Double-check the username carefully because Bright Data usernames often include configuration parameters. Even a small typo can break the connection.
Once everything is entered correctly, click Save Changes.
Step 9: Test the Proxy Connection
- Inside the same dialog box in ProxyBridge, click Test Connection and wait for confirmation.
- If the test fails, recheck the SSL certificate installation, restart your device, confirm KYC completion, verify firewall permissions, and ensure your credentials were copied correctly.
Understand IP Rotation Behavior
Bright Data residential proxies rotate IP addresses by default. That means each request will use a different residential IP address. Refreshing pages or opening new tabs will change your IP automatically.
If you didn’t configure a session or location parameter inside the username, rotation is expected behavior and usually means the proxy is working correctly.
Step 10: Confirm Successful Setup
If ProxyBridge confirms the connection and your traffic routes through the proxy, your residential proxy is now successfully configured. At this point, you have system-wide residential proxy routing enabled on your Windows PC.
Additional Notes and Tips
When You Might Modify the Username
Bright Data allows you to customize proxy behavior by modifying the username string. This can control country targeting, region targeting, ISP selection, sticky sessions, or specific IP pools. Beginners should stick with the default username until they fully understand these parameters.
Common Beginner Mistakes
- Skipping SSL certificate installation: Windows won’t trust Bright Data’s routing server without SSL certificates, causing most requests to fail.
- Not completing KYC verification: Because residential IPs are highly functional, Bright Data requires identity verification to prevent misuse and policy violations.
- Copying credentials incorrectly: Proxy authentication is extremely strict and even one missing character breaks login validation.
- Blocking proxy permissions in Windows Firewall: Windows may silently block network routing without proper permission approval.
- Expecting a static IP by default: Residential proxies rotate automatically unless session or sticky parameters are configured.
Frequently Asked Questions (FAQs)
Use ProxyBridge’s test connection feature or visit an IP checker website to confirm your IP address changes through the proxy network.
Residential proxies rotate IPs by default. This is normal behavior unless you configure sticky sessions in the username.
Yes, but authentication and rotation settings are harder to manage. Proxy management software is usually more stable.
Yes. Without it, certain secure websites may block connections or trigger certificate errors later.
Yes. The steps remain nearly identical since proxy routing and certificate installation work the same way.
Hi, I'm Jayden Sprent. Dive into the world of proxy servers with my expert evaluations and insightful analyses based on thorough research. I'll share my experiences and comprehensive guides to help you make informed decisions about proxy services.
Jayden Sprent